Jingcheng Inspection Service uses a well-proven and widely adopted international quality inspection standard ISO2859 (equivalent to MIL-STD-105e, ANSI/ASQC Z1.4-2003, NF06-022, BS6001, DIN40080, and GB2828) to measure the acceptable quality level of the products we inspect in Asia.
WHAT IS AQL?
AQL stands for Acceptable Quality Level. It is defined as the “quality level that is the worst tolerable”. We use the well-proven and widely adopted international standard ISO2859 (equivalent to MIL-STD-105e, ANSI/ASQC Z1.4-2003, NF06-022, BS6001, DIN40080, and GB2828) to measure the acceptable quality level of the products we inspect.
Most of the inspections made in China factories are prepared and conducted by inspectors who follow the AQL standard. This standard defines the accepted defects limits according to the client’s expected quality, hence the name, Acceptance Quality Limit (previously Acceptance Quality Levels).
WHAT IS SAMPLING TABLE?
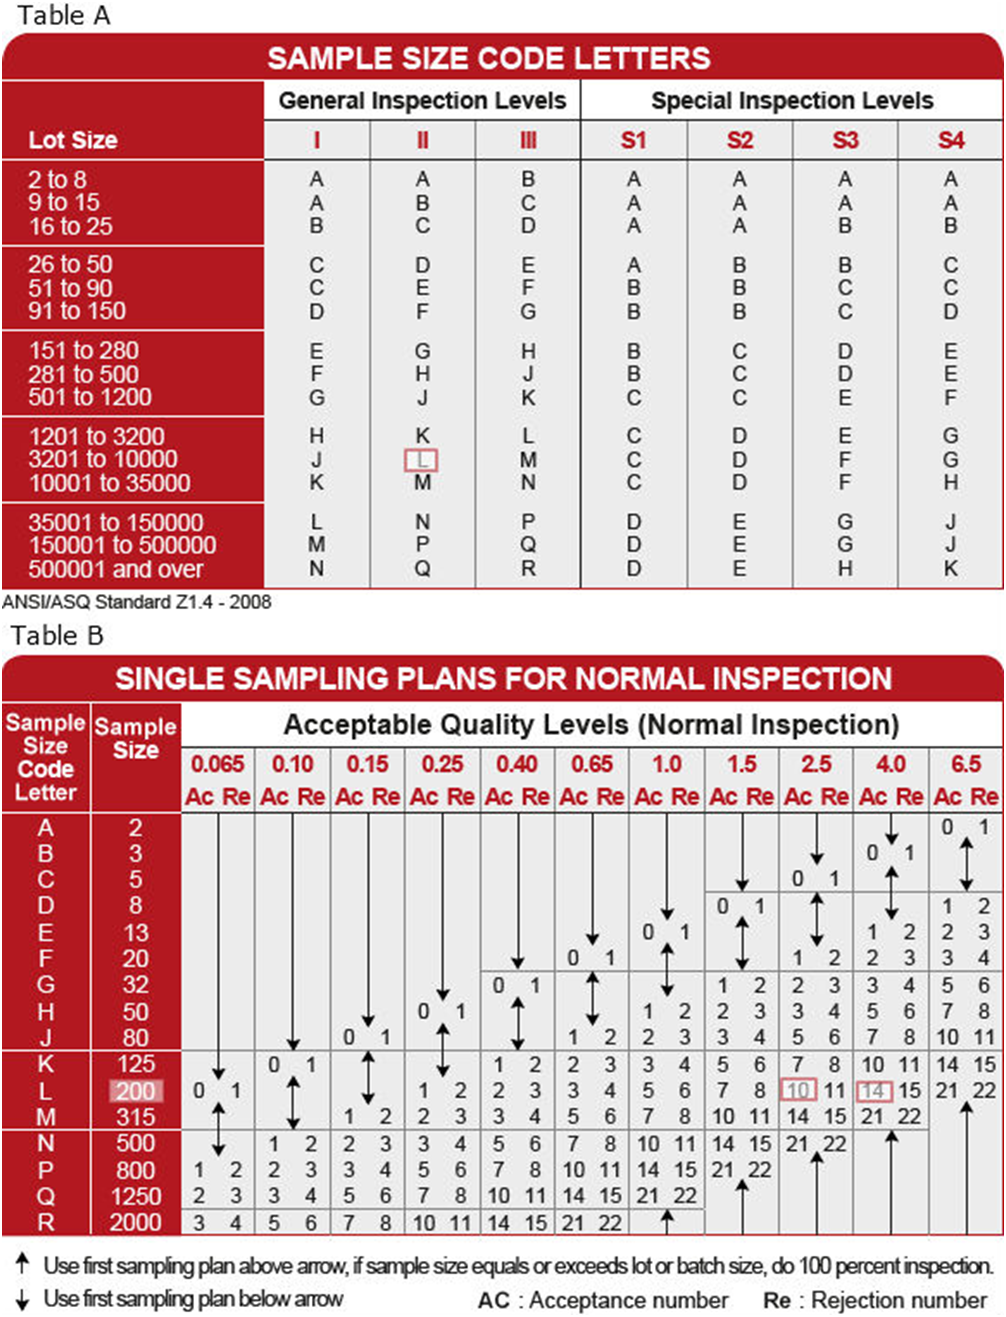
The sampling table includes 2 tables. One is the table to determine the code letters as per the lot size (see table A below), the other is the AQL table (see table B below) which tells the sample size should be chosen and the maximum acceptable defect counts.
HOW TO DETERMINE THE SAMPLE SIZE & ACCEPTANCE NUMBER?
For example, the order quantity is 8,000 and we select general inspection levels-II to be as the sampling method, then we can get a sample size code letter L (see Table A). With this code letter, and if we take the single sampling plan for normal inspection, we can get the sample size: 200 from table B. It means that 200 samples can well represent this order. For an AQL of 2.5, the corresponding acceptance number is 10 and the rejection is 11.

As a default, JINGCHENG Inspection Service uses general inspection level II, Single sampling plan, and the AQL of:
Critical: 0
Major: 2.5
Minor: 4.0
For example, if there’s an order with 6,000 products, then according to JINGCHENG Inspection Service default sampling technique, the sample size will be 200 products.
The maximum acceptable defect number will be:
Critical: 0 defective products
Major: 10 defective products
Minor: 14 defective products
DEFECT CLASSIFICATION AND DEFINITION
Otherwise specified by customers, JINGCHENG Inspection Service usually defines the defects as below:
CRITICAL
A Defect that is likely to result in unsafe conditions or contravene mandatory regulation. In our normal practice, no Critical Defect is accepted; any of this kind of defect found will be subjected to an automatic rejection of the inspection result.
MAJOR
A Defect that would reduce the usability of the product or that shows an obvious appearance defect that would affect the sales of the product.
MINOR
A Defect that does not reduce the usability of the product, but it is still beyond the defined quality standard and may influence the sale
